December 30, 2010

Two Forward and One Back

Expect the unexpected during renos.

As Rory just mentioned, we removed the wall separating the dining room and the kitchen in order to “open the space” somewhat and to make the small kitchen appear less confined. We are referring to the eating space as the dining room even though in its previous life it was referred to as the sitting room. We had converted the previous formal dining room into what we call the “hub room”. If that is confusing, from now on, consider the eating space as the informal dining room or just the dining room - we have no time to sit anyway.

It was our initial intention to just remove/replace the ceilings in both the dining room and the kitchen in order to install recessed lighting. After experiencing the resistance of the aforementioned 50+ year old double-drywalled- screwed-and-glued-to-aged-fir wall, and being familiar with the effort of replacing drywall in ceilings (see earlier posts), I searched for a less painful means of upgrading the lighting in these two critical rooms. Additionally, I appreciated the detail of the hand crafted 1960 plaster swirl ceiling in the dining room. It would be unfortunate to lose that bit of history that makes this house so special.

For those that have physically been at the site of our current renovations, and for whom architectural detail is important, there is no upper floor above the East end of the house. Although the dining room is not vaulted like the living room, it shares the same roof configuration, namely that there is no accessible attic above this portion of the house. I rightly expected to find that the space above the dining room would be unheated and contain some form of 1950-60’s insulation. Installing recessed lighting in such an area demands fixtures that are building code rated as “IC” (insulation contact). Normally IC-rated fixtures are installed in a large housing that provides sufficient air space around the actual lighting fixture so as to prevent contact with the insulation and maintain at least 3 in. spacing from anything combustible. These housings are usually installed from within the attic space before the ceiling drywall is installed. It appears that we were at an impasse and our options were: (a) remove the ceiling (and the plaster swirl affect), install the large IC-rated housings and recessed fixtures then replace the double drywall ceiling; or (b) change our vision of the new dining/kitchen area and not use recessed lighting – dull and boring!

Google is your friend. Not satisfied with either of the above options, I was certain that someone somewhere would have encountered the same issues and developed a solution. After reviewing dozens of DIY and electrical forums as well as searching for specialized recessed fixtures, I happened upon a solution and made a proposal to “the boss in all matters kitchen” that would enable us to retain the dining room ceiling yet still have recessed accent lights. After checking with an electrician friend as well as the city electrical inspectors for an interpretationn, she gave me the go ahead to … “make it so #1”.

The solution: Use European-designed recessed lighting fixtures that are IC-rated and require as little as 60mm (2 3/8”) clearance inside the ceiling and can be installed through the 76mm (3”) fixture hole. Electrical cabling to/from each fixture would be fished from the fixture hole to the nearest wall where it would exit in a small hole adjacent to the wall where it would be hidden behind crown molding. This is more evident by looking at the pictures. Naturally, the Canadian distributor of the lighting fixtures did not have representation in Alberta but would ship direct. In a few days, I had the fixtures in my hands and confirmed that our vision was achievable.

It goes without saying that said fixtures were more than 3 times the cost of non-IC fixtures available in our local home reno outlets but since we only had a requirement for 4 accent lights in the dining room, it was an acceptable investment to maintain our vision. Besides, in the kitchen, where we required 10 additional fixtures, I expected that we could use the less expensive alternatives since the second level of the house sits over the West end of the building and normal construction methods should present non-obstructed, non-insulated above ceiling air space.

As the title of this blog entry suggests, when in the midst of renovations of a 50+ year old house, expect the unexpected. The first seven feet of the kitchen nearest the dining room were also insulated despite being on the West side of the former dividing wall. This, of course, I found out after coring the first 4” hole for the kitchen recessed fixture. After deploying a few descriptive expressions, I sent Kathryn a rather informative email advising her of my discovery and what I thought of it. Obviously IC-rated fixtures were required for at least some of the kitchen fixtures. I made the executive decision to return all the 10 relatively inexpensive non-IC-rated 4” fixtures to Rona, and order an additional 10 of the expensive 3” IC-rated fixtures.


While we wait for the IC-rated fixtures to arrive, we will patch the first 4” hole in the kitchen ceiling, drill the 3” holes for the new fixtures, and get on with it. I keep telling myself that it will be lovely when it is done.

…. Until the next surprise.

December 29, 2010

The Wall


Momma's got a new job at work so tonight she's too tired to be witty. That means I get to show you the pictures of the wall coming down. I helped. Really. Like, I totally followed her around and sniffed everything. Eventually they put me behind a piece of plastic, but it really wasn't necessary. I don't mind the dust. This is me wondering why they moved the stove. And especially why they were so quick to sweep up all the bits from underneath the stove. It looked like there was good stuff to sniff, but I didn't even get the chance. You can see the built in microwave above the stove area. It took them ages to get that thing out. And they said a lot of bad words too.

Here's Norm, and you can see the microwave is gone now!


And when they started taking the wall down, here's the vantage point I had. They put a sheet of poly between the living room and dining room. Momma said something about making a movie called "Dog in a Bubble". Not funny. Maybe she was tired that day too. I was doing my best to look forlorn and left out. How'd I do?


Here's the view from the dining room side when they were taking the drywall off. Two layers on each side of the wall. There really was a lot of mess.


Here's the view from the kitchen side when they got some of that drywall off.


And this is it all down. They moved the old fridge into the dining room along with one of the base cabinets. They eventually turned the stove around and now she's cooking in the dining room. I don't much care where the cooking happens, as long as I'm close to it. So here's me, with my blankie right in the middle of things.


Speaking of food, I think I should get some extra for typing all this out on the teensy netbook while I was sleeping at Momma's feet. Pretty amazing, huh?

December 28, 2010

A Plan Comes Together

Have you ever put a puzzle together only to find a piece missing? What about thinking you had it together and you had all the pieces, when in fact you didn't? Okay, probably 'no' to that last one. Me either. But that's how I felt about the kitchen until tonight. Other than finalizing the finish for the cabinet doors, we thought the kitchen planning stage was done. We had an idea of what colour the doors were going to be, but had yet to go to the special paint place to have them mix some samples for us to try on slabs of maple - we were likely to end up with a custom colour, but it would be some shade of white. Problem was, Norm and I were both (without telling each other) having trouble reconciling what we thought we wanted with the practical application this entailed. For his part, it would be trying to get a white finish to look the same on the side of the cabinets (birch) as it would on the doors (maple) and making the edge banding match too. For my part it was the thought of having yet more painted wood in the house. The place is replete with mahogany. Mahogany paneling in the living room, which is getting painted a yet to be determined colour. Mahogany doors and casing everywhere, which is bit by bit being replaced and painted on off-white (bleached linen or antique lace to be more specific). That's a lot of painted wood. There will be other white things too...the stark white of the frames of the new windows, the soon to be whiter ceilings, the white crown molding. Too many kinds of white. So even though we had agreed on white cabinetry, my brain was subtly trying to make known that in the context of the rest of the house, this wasn't the best plan. That was the missing piece for me. And I didn't want to say anything to Norm because I thought he was pretty set on a white kitchen and far be it from me to be second guessing and pulling the female card by changing my mind. He didn't want to say anything to me because he thought I was set on it and he would simply have to make it happen (yeah, he's nice that way).

When we started planning the look of the kitchen our approach was to share photos of things we liked, get samples of materials, and generally make a lot of visits to a lot of different places. Then narrow down our list of likes to the things we really like and then try to come up with a workable combination based on those things. Easier said than done. I like old fashioned white sinks with embellished aprons. I also like the super modern look of a Kohler Stages 45 sink. Norm likes cherry cabinets and white cabinets. I like dark stained cabinets and white cabinets. You get the idea. In any event, we had narrowed it all down and like I said we were pretty clear except for a final detail. We picked up a sample slab of our counter top material today so that we could take it tomorrow to the cabinet finishing place and figure out what kind of "white" we wanted for the doors. The drive home (don't you love having a captive audience) was my last ditch 'are we totally sure this is the way to go' pitch. And wouldn't you know it, we were both having doubts. By the time we arrived in our driveway, we had come up with what we thought was an even better way to go.

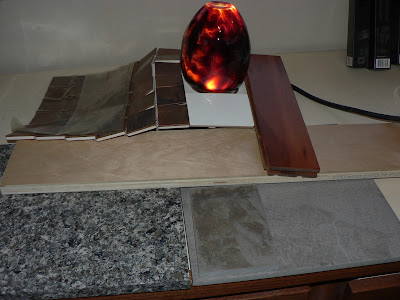
When we put all the pieces together on the counter to see if our theory would pan out, it did. The weird part about it is that neither one of us would normally have been drawn to maple cabinets with a clear finish. But in this context, it works perfectly for us. Photos won't do it justice, and obviously there is no accounting for personal taste, so you all might not like where we're going, but have found our groove on this one. We love it. No painted wood. Lots of natural stone to tie in with all the stone both outside and in the rest of the house (don't forget the big honkin' fireplace - floor to ceiling stone). Natural wood cabinets that don't clash with the tiger wood floor.


The small tiles in the upper left are copper. They'll be added as accents to the floor. You have to keep the copper in mind because the hood fan cover with be copper and stainless steel. The appliances are also stainless steel. The big block in the bottom left is the quartz counter top. Shades of copper, dark green, off-white, grey. The small 4x6 tile is the natural stone back splash. It looks grey but when it is sealed it is almost the same grey/green/taupe (okay, kinda hard to describe) colour in the quartz. Once it's sealed you can also see more variations in the stone itself. The tile on the right is the porcelain floor tile. It has a bit of a copper glow brushed on it. The slab of wood in the middle is clear varnished maple. The white square piece is about the colour of the crown molding. The dark piece of hardwood flooring is the tiger wood we used in the TV room and is also going in the living and dining rooms, so it will be visible with the kitchen. The pendant light is there just because we have three of them to go over the peninsula - the effect of light on the glass is definitely not caught in this photo, but maybe you'll get the idea. Wall colour...and there is hardly any wall left, is still to be determined.


The first photo just above is a close-up of the quartz. The second are the materials, but with the back splash stone wet so you can see what it looks like with the sealant.

Next post: the wall comes down and the wires go in.

December 7, 2010

The Gift

What is it? Well, the blanket was woven for me by my mother and it was a gift. It's gorgeous. It's my most favourite thing to wear around the house. I'd like to wear it to work. But this isn't a weaving blog. And most certainly not a fashion blog.


It's the thing on the blanket that should get your attention. I've given up staying on top of all of Norm's tool acquisitions. And apparently he has given up on filling me in on each and every one. This little gem came out out of the garage on the weekend when I finally demonstrated an interest in the detailed mechanics of cabinet making. The kind of stuff that keeps Norm awake at night. I had some questions and in answer to some of them (and with what was no doubt well contained excitement that I wanted to SEE a tool) Norm brought a little box of goodies in from the garage. This, my friends, is a tool designed specifically for pressing edge banding onto cabinet carcasses. Not something you need every day, but leave it to Norm to have just the thing.


This is the underside. What look like wheels in the top photo are actually metal rollers that you roll along the front edge of the cabinets to help the banding adhere. I fell in love with this little thing. Zoom zoom. It looks like something I'd give my nephew to play with. Speaking of which, I didn't buy him anything for his birthday last month. Now before you all boo and hiss, hear me out. I was babysitting him recently and we were playing with a computerized 'thing' that he said he got for his birthday. I asked who gave it to him. And he didn't know. Okay, okay, he's five years old...but this was a cool little laptop-type thing. This experience, and not wanting to add to the already overcrowded toy department that is my brother's basement, caused me to do things a bit differently this year. Instead of buying him a gift we spent the day with getting craft supplies and then making a Christmas wreath for his mum and dad's front door. He also came with me to pick out a new toy to donate to a local charity for underprivileged children. The concept that some children might not get gifts was a stretch for him, but he handled it with his usual aplomb by asking if he would get to play with it before we gave it away. Satisfied with my explanation for why not, we then carried on and had a little birthday lunch at DQ. And all was well in his world. And some little person without an overflowing toybox will get a Christmas gift from my nephew this year.

December 5, 2010

Poetry Behind Closed Doors

Today was officially day one of kitchen renovations. After months of planning everything from the basic layout to the floor tile, from how much overlay the cabinet doors should have to whether we should use the clips supplied when we install the sink (which I still haven't ordered), from appliances to cupboard inserts, from hood-fan to lighting diagrams. All that, but when you actually begin the physical piece you realize just how much more there is to go. But the rest should be working with the plan, not planning the work. Fingers crossed.

The achievement of the day was knocking out the wall between the kitchen and the dining room. Photos will follow. Watch for photos of The Dog In The Bubble.

 We also took out most of the existing cabinetry, all of which must have been custom-built on site. This wasn't the standard stuff that one person could hang. One upper row was four double cabinets long - all one piece. When we finally horked that thing off the wall we were pleased (in addition to still having all of our fingers and only minor bruises on our heads) to discover ancient cave drawings. Well okay, not really. But there were some drawings. And for fans, a little ode to the Jabberwock.


Cool, huh?

What gets me is the time this person took to switch colours while writing. I get the whole leaving something for posterity. I won't lie. I put a note inside a sealed baggie and hid it away when we first started renovating the house. The only way it will get read is if somebody finds it during a demolition. And of course I'm hoping that time is far, far off. Ink though. One colour only.


I don't know if the poet was also the artist:


You can see the line from Jabberwocky in teeny multi-coloured lettering underneath the drawing.

Just so there are no misunderstandings here, I wouldn`t claim to know anything about Lewis Carroll other than Alice and her frustrations with the Mad Hatter and even that is strictly from the recent movie. I was, however, 98% certain of where the line came from (and for the additional 2% certainty, Google really is your friend) since I remember a childhood friend of mine who had a particular fascination with the poem. There were occasions where "Beware the Jabberwock!" was the warning shouted when Barbie and Ken were in imminent peril during one of our adventures (I suppose we should have stuck to playing house with the dolls like other girls).

There was another piece to this bit of self-expression. A little Big Bang Theory, if you will:


I feel fairly confident in suggesting that the bottom equation is true - and I don't need Google for confirmation. As for the rest...well, I can't be bothered right now but if any of you know what it is, I am listening.